2 git
Prerequisite
- 正如标题名字,我们需要使用 git 以及 github 的使用(重点在于后者
) ,需要大家自己安装好 git 工具; - 我没有使用过 github desktop,这里不会进行讲解,GitHub 将使用网页端,大家可以在 github 右上角自行注册一个账号,名字 / 邮箱之后都可以修改,不必太纠结(当然名字修改了对应了 url 改变,还是有点麻烦的
) ; - 对 github 的访问不稳定(可以自行了解
) ,这一点需要大家自己解决。
Extra
由于我学习的也是往期课程 lec2:Git/GitHub 基础介绍,且学长讲得非常详细,其中对 gitpage 和 action 讲解比较简略,所以这堂课对 git 的使用会很简略,空出更多时间进行实践演示。
时间有限,我们对 git 本身的讲解时不会全部进行演示,对于过程在文中都有记录,大家可以对照复现练习。
简介 
Git (/ɡɪt/) is a distributed version control system that tracks versions of files. It is often used to control source code by programmers who are developing software collaboratively.
Git 是一种分布式版本控制系统,用于跟踪文件的版本,通常被程序员用来控制协作开发软件的源代码。
Git 是一个强大的 分布式版本控制系统 (DVCS),它能帮助你:
- 追踪文件变化:记录谁在什么时候修改了什么;
- 版本回溯:轻松回到文件的任何历史版本;
- 团队协作:让多人高效地在同一个项目上工作。
Git 工作流模型 
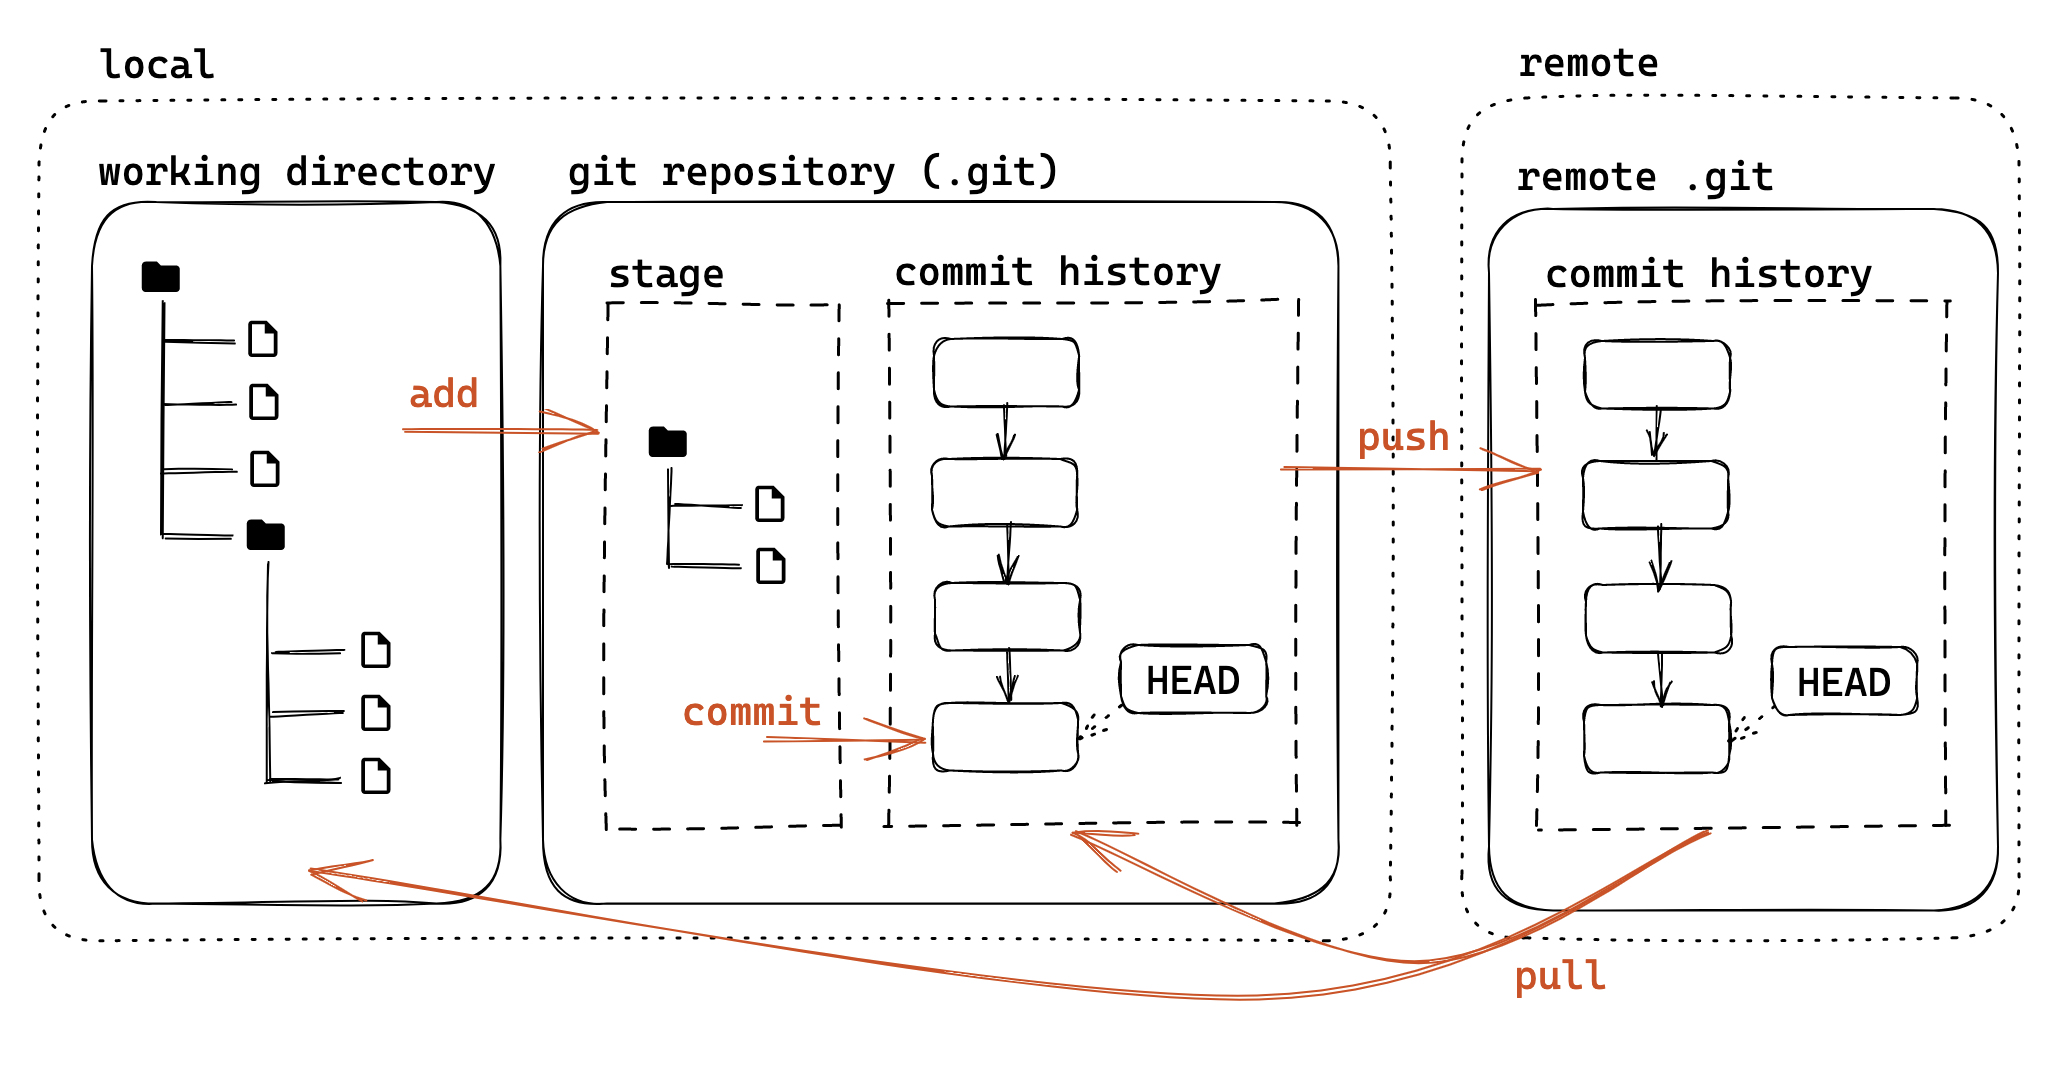
图片来自 https://slides.tonycrane.cc/PracticalSkillsTutorial/2023-spring-cs/lec2/ #/1/2
理解 Git 的三个关键区域很重要:
- 工作区 (Working Directory):你当前在电脑上直接看到和编辑的文件;
- 本地仓库 (Local Repository):存储在你的电脑上的项目版本历史 (".git" 目录 );
- 暂存区 (Staging Area / Index):一个临时区域,用来存放你 准备 提交的文件修改;
- 提交历史 (commit history):提交历史版本查看和管理;
- 远程仓库 (Remote Repository):托管在网络服务器(如 GitHub, Gitee, ZJU git)上的项目版本历史,用于备份和协作。
基本配置 
开始使用 Git 前,我们需要进行一些配置(git config
Tip
在下面的命令中,--global 代表全局的配置;针对某一项目,不添加这一选项可以进行单独设置 / 查看;即对于一个项目默认使用全局配置,如有特别设定则覆盖。
$ tldr git config
git config
Manage custom configuration options for Git repositories.These configurations can be > local (for the current repository) or global (for the current user).More information: > https://git-scm.com/docs/git-config.

 - Globally set your name or email (this information is required to commit to a repository and will be included in all commits):
   git config --global {{user.name|user.email}} " {{Your Name|email@example.com}} "

 - List local, global or system configuration entries and show their file location:
   git config --list -- {{local|global|system}} --show-origin

 - Set the global value of a given configuration entry (in this case an alias):
   git config --global {{alias.unstage}} "reset HEAD --"

 - Get the value of a given configuration entry:
   git config {{alias.unstage}}

 - Use an alias:
   git {{unstage}}

 - Revert a global configuration entry to its default value:
   git config --global --unset {{alias.unstage}}

 - Edit the local Git configuration (.git/config) in the default editor:
   git config --edit

 - Edit the global Git configuration (~/.gitconfig by default or $XDG_CONFIG_HOME/git/> config if such a file exists) in the default editor:
   git config --global --edit
| 命令 | 描述 |
|---|---|
git config --global --list |
查看所有全局配置 |
git config --global user.name "Your Name" |
设置全局提交者姓名 |
git config --global user.email "your.email@example.com" |
设置全局提交者邮箱 |
git config --global user.name |
查看全局提交者姓名 |
git config --global user.email |
查看全局提交者邮箱 |
初始化 
| 命令 | 描述 |
|---|---|
git init |
在当前文件夹中初始化一个新的 Git 本地仓库,会创建一个隐藏的 ".git" 目录。 |
git init <directory> |
创建一个新文件夹 <directory> 并将其初始化为 Git 仓库。 |
$ z git_demo # 表示下面的操作在 git_demo 文件夹中进行
$ mkdir demo-repo
$ git init demo-repo
hint: Using 'master' as the name for the initial branch. This default branch name
hint: is subject to change. To configure the initial branch name to use in all
hint: of your new repositories, which will suppress this warning, call:
hint:
hint:   git config --global init.defaultBranch <name>
hint:
hint: Names commonly chosen instead of 'master' are 'main', 'trunk' and
hint: 'development'. The just-created branch can be renamed via this command:
hint:
hint:   git branch -m <name>
$ # git config --global init.defaultBranch main # 比如我比较喜欢 main
git init 会在指定文件夹中生成一个 ".git" 文件夹用于对指定文件夹对应的仓库进行管理,如下:
$ tree . -a -L 2 # -a 展示隐藏文件,-L 指定最大显示层级
.
└── .git
    ├── FETCH_HEAD
    ├── HEAD
    ├── branches
    ├── config
    ├── description
    ├── hooks
    ├── info
    ├── objects
    └── refs

6 directories, 4 files
具体内容可以参考探索 Git 结构,我们不进行详细讲解;目前来说,我们已经成功创建了一个空的仓库。
本地版本控制核心操作 
这是 Git 日常使用中最频繁的部分,用于追踪和保存文件的修改。一般而言,一个项目应该有一个自述文件 (README.md) 来向别人介绍这个仓库 / 项目的目的,使用方法,索引资源等。
$ nano README.md
... edit ...
$ mkdir sub-repo
$ nano sub-repo 1.txt
... edit ...
$ git add README.md # 将指定路径下的文件(夹)放入暂存区中
$ git status # 查看当前 git repo 中的文件修改情况,一般可以用别名 `gst` 表示
On branch master

No commits yet

Changes to be committed:
  (use "git rm --cached <file>..." to unstage)
        new file:   README.md

Untracked files:
  (use "git add <file>..." to include in what will be committed)
        sub-repo/
可以看到,我们将 "README.md" 通过 git add 加入暂存区,显示为 “Changes to be committed”;而没有操作的 "sub-repo" 则表示为 “Untracked files”。
$ git commit [path/to/file]]# 将会以默认设置的终端编辑器打开

Please enter the commit message for your changes.Lines starting
with '#' will be ignored,and an empty message aborts the commit.
#
# On branch master
#
# Initial commit
#
# Changes to be committed:
#     new file: README.md
#
# Untracked files:
#     sub-repo/
git commit [path/to/file] 表示将当前暂存区中的 [path/to/file] 修改加入 commit history 中,如果不填写则默认将暂存区中所有修改放入;对于每次提交,我们应该添加一段 commit message 来记录更改的原因 / 内容,方便定位 / 回溯(特别是合作项目<type>([scope]): <summary> 的格式,即 “修改类型(影响范围
的形式来避免进入编辑器,提高效率;一般而言,commit types 如下,scope 和 summary 相信不必多言。
| Commit Type | Title | Description | Emoji |
|---|---|---|---|
| feat | Features | A new feature | ✨ |
| fix | Bug Fixes | A bug fix | 🐛 |
| docs | Documentation | Documentation only changes | 📚 |
| style | Styles | Changes that do not affect the meaning of the code | 💎 |
| refactor | Code Refactoring | A code change that neither fixes a bug nor adds a feature | 📦 |
| perf | Performance Improvements | A code change that improves performance | 🚀 |
| test | Tests | Adding missing tests or correcting existing tests | 🚨 |
| build | Builds | Changes that affect the build system or external dependencies | 🛠 |
| ci | Continuous Integrations | Changes to CI configuration files and scripts | ⚙️ |
| chore | Chores | Other changes that don't modify src or test files | ♻️ |
| revert | Reverts | Reverts a previous commit | 🗑 |
| content | Content | Changes that only affect the content (e.g. HTML, markdown) | 📝 |
| security | Security Fixes | Fixes that address security vulnerabilities | 🔒 |
| typo | Typo Fixes | Correction of typos in code, comments, or documentation | 🔍 |
| wip | Work in Progress | Indicates that the commit is a work in progress | 🚧 |
Extra
我自己之前的很多 commit message 都确实不是规范的,web-github 给出的样例似乎也不是那么严谨。
OK,那么现在我们可以填写 commit message 了:"feat: initial the repo." 。
$ git commit -m "feat: initial the repo."
[master (root-commit) 8530407] feat: initial the repo.
 1 file changed, 3 insertions(+)
 create mode 100644 README.md
$ git status
On branch master
Untracked files:
  (use "git add <file>..." to include in what will be committed)
        sub-repo/

nothing added to commit but untracked files present (use "git add" to track)
$ git log
commit 8530407208f35d44ff2c0919a5228d0c7c2ba5bb (HEAD -> master)
Author: qssg <qssgatcn@gmail.com>
Date:   Sat Mar 29 15:23:12 2025 +0800

    feat: initial the repo.
重复前面的操作,我们再添加一个一般用于存放项目详细介绍文档 "docs" 进行提交。
$ z demo-repo
$ mkdir docs
$ nano docs/index.md
$ git add docs
$ git commit -m "docs: init the docs"
$ git log
commit ff83dd5e5f2d742f93888e1fe6f2faeb65a56032 (HEAD -> master)
Author: qssg <qssgatcn@gmail.com>
Date:   Sat Mar 29 16:04:42 2025 +0800

    docs: init the docs

commit 8530407208f35d44ff2c0919a5228d0c7c2ba5bb
...
注意到每次提交后在 commit 后都有一个 SHA-1 作为提交的唯一标识符(160 bits, 40 hex chars, 20 bytes
$ git show 8530407208f35d44ff2c0919a5228d0c7c2ba5bb # 在不引起误解的情况下,前面几个 hex char 即可
commit 8530407208f35d44ff2c0919a5228d0c7c2ba5bb
Author: qssg <qssgatcn@gmail.com>
Date:   Sat Mar 29 15:23:12 2025 +0800

    feat: initial the repo.

diff --git a/README.md b/README.md
new file mode 100644
index 0000000..675954d
--- /dev/null
+++ b/README.md
@@ -0,0 +1,3 @@
+# Demo Repo
+
+This is a repo for demostrating usage of git and git repo.

$ git checkout 8530
Note: switching to '8530407208f35d44ff2c0919a5228d0c7c2ba5bb'.

You are in 'detached HEAD' state. You can look around, make experimental
changes and commit them, and you can discard any commits you make in this
state without impacting any branches by switching back to a branch.

If you want to create a new branch to retain commits you create, you may
do so (now or later) by using -c with the switch command. Example:

  git switch -c <new-branch-name>

Or undo this operation with:

  git switch -

Turn off this advice by setting config variable advice.detachedHead to false

HEAD is now at 8530407 feat: initial the repo.

$ git switch -
Previous HEAD position was 8530407 feat: initial the repo.
Switched to branch 'master'
关于 "detached HEAD" ,我们可以查看 detached HEAD 问题
$ git checkout -b dev [reference] # 基于 reference 创建并切换分支,默认为当前分支
$ git branch # 查看分支
 *  dev
    master

$ mkdir docs/intro
$ vim docs/intro/index.md
$ git add -A
$ git commit -m "docs: add intro folder"
[dev c35e6ae] docs: add intro folder
 2 files changed, 4 insertions(+)
 create mode 100644 docs/intro/index.md
 create mode 100644 sub-repo/1.txt
$ gst
On branch dev
nothing to commit, working tree clean

$ git checkout master # 已经存在的分支可以直接切换
$ gst
On branch master
nothing to commit, working tree clean
在上面的操作中,我们创建并切换到了 dev 分支,并且执行了一些操作;当我们提交修改后,切换回 master ,会发现之前的修改都被撤销了(以工作区的内容展示为基准;包括当时还在 master 时创建的 sub-repo 内容,这也是我们之前一直没将其添加进提交的原因
$ git checkout master
$ touch docs/base_use.md
$ vim docs/adv_use.md
$ git add -A
$ git checkout dev
A       docs/adv_use.md
A       docs/base_use.md
Switched to branch 'dev'
可以看到修改工作区中修改还保留着,直到 commit 这个修改才真正属于一个分支,查看分支(续) 也许有更好地理解。
分久必合,我们可以把分支看作是不同的开发者共同基于一个修改(master)进行开发,最后呈现给用户的内容肯定有个准,即将分支及进行合并。如果合并顺利(两个 / 多个分支的修改之间没有相互影响git merge <branch2> 可以合并修改至 branch1。
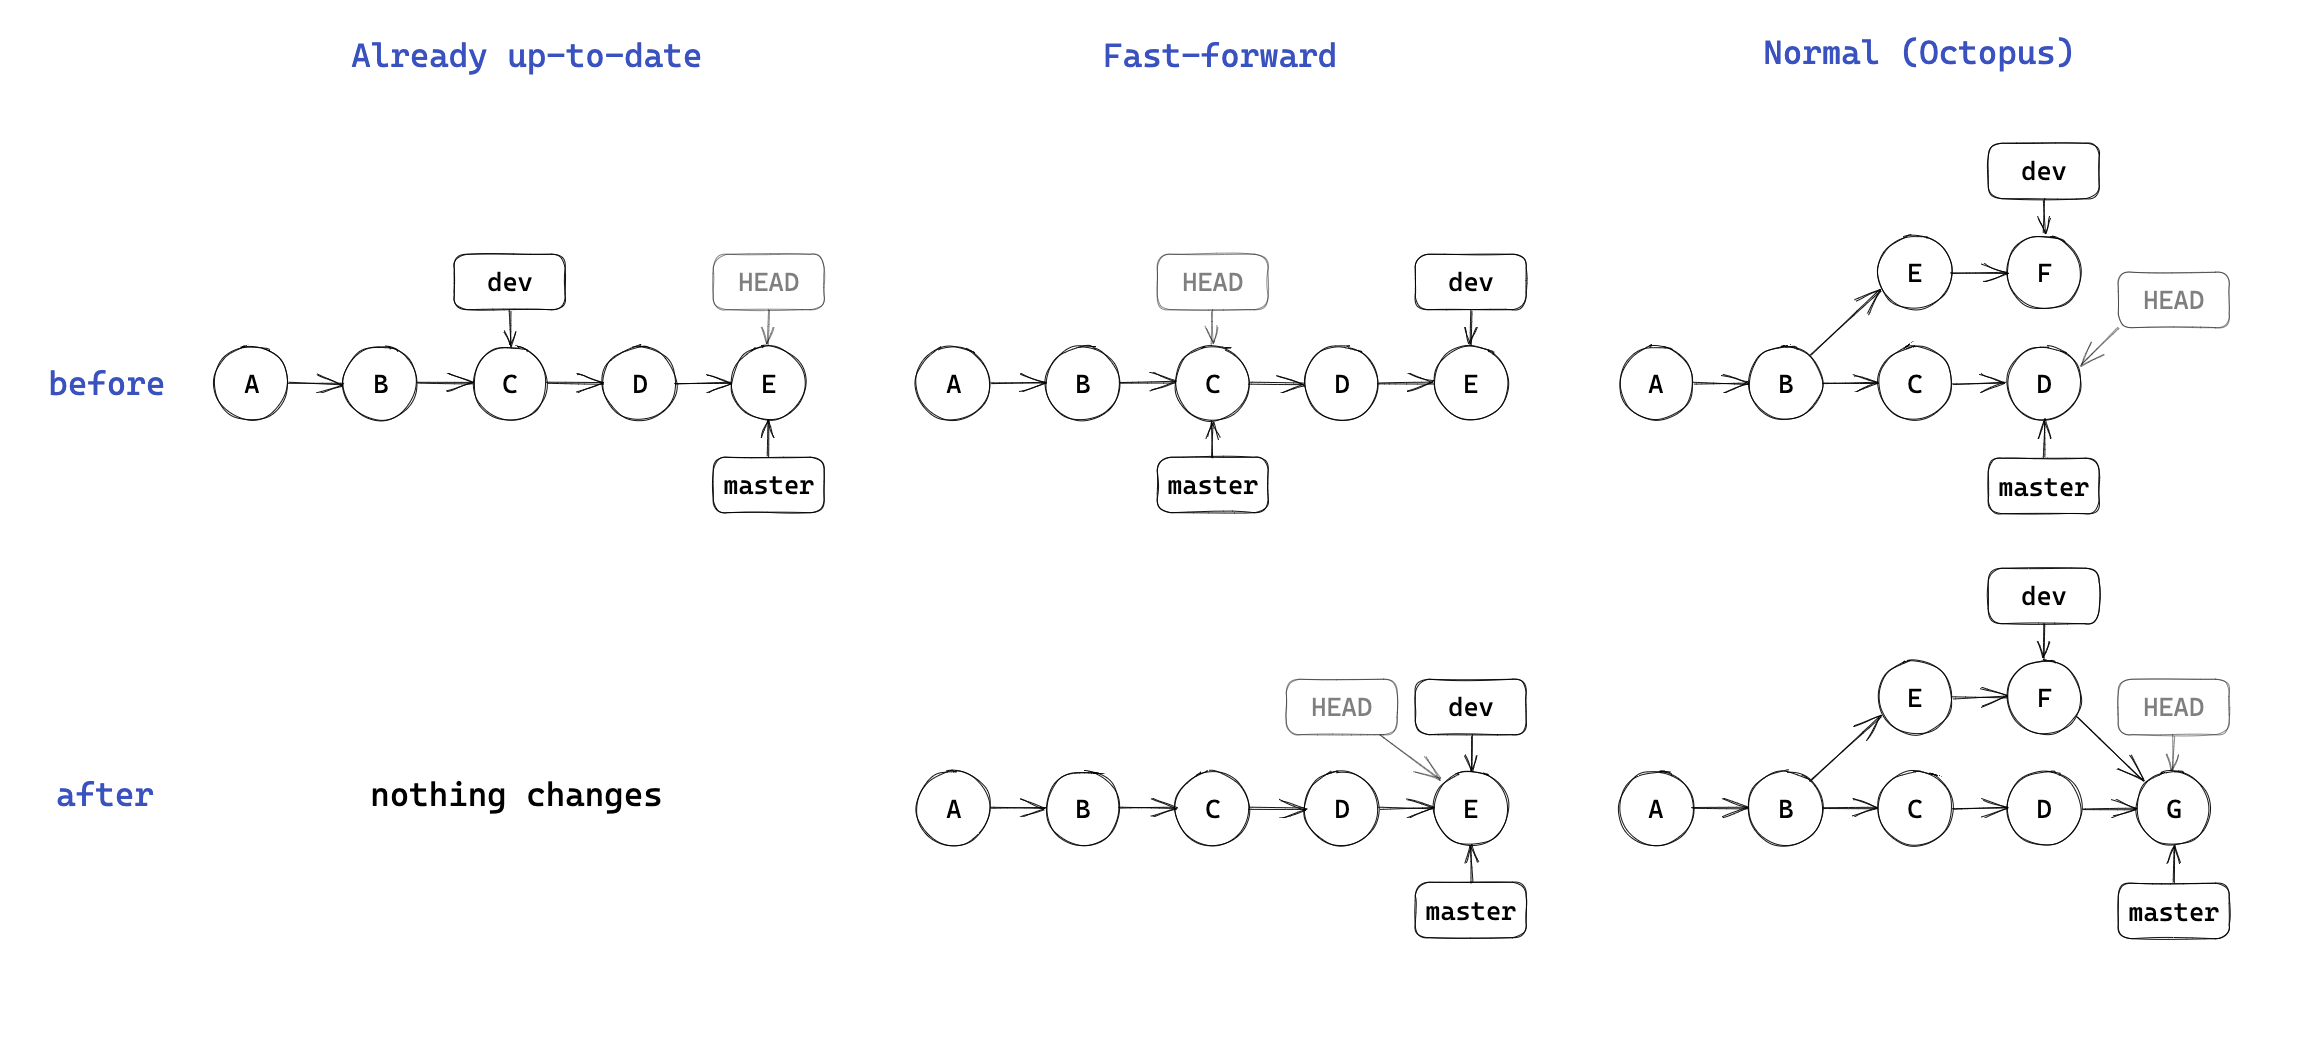
图片来自 https://slides.tonycrane.cc/PracticalSkillsTutorial/2023-spring-cs/lec2/ #/2/9
但是如果碰见冲突,则需要手动修改进行选择:
$ git checkout master
$ # modify conflict.md, add, commit
$ git checkout dev
$ # modify conflict.md, add, commit
$ git merge dev
Auto-merging docs/conflict.md
CONFLICT (content): Merge conflict in docs/conflict.md
Automatic merge failed; fix conflicts and then commit the result.
<<<<<<< HEAD
I am in the branch of master.
=======
I am in the branch of dev.
>>>>>>> dev
此时需要手动修改进行保留;随后将修改后的文件重新添加:
完成了合并;如果希望保留 dev 分支,可以在 dev 分支进行 git merge main 以使得两个分支同步。
我们可以用 git log --graph 来图形化打印出我们的提交记录(下面的展示是在本文写完并调整后打印的,不完全对应于前面的内容
$ git log --graph --oneline --decorate --all
*   cfe89fa (HEAD -> master) feat: merge dev branch
|\
| * a01626b (dev) docs: edit conflict.md dev
* | 4a6153a docs: edit conflict.md master
|/
*   a1c02af (origin/master) docs: modify confilct
|\
| * 464e513 docs: edit conflict.md master
* | 6a143e8 docs: edit conflict.md dev
|/
* 8dc5a0d docs: rm intro; add conflict
* 26316b1 docs: add master conflict.md
*   bfe1e30 Merge branch 'dev' for testing
|\
* | e82c994 docs: add adv/base_use.md
| | * 0273fe5 (refs/stash) WIP on dev: c35e6ae docs: add intro folder
| |/|
| | * d0d0510 index on dev: c35e6ae docs: add intro folder
| |/
| * c35e6ae docs: add intro folder
|/
* ff83dd5 docs: init the docs
* 8530407 feat: initial the repo.
小结
| 命令 | 描述 |
|---|---|
git status |
查看工作区和暂存区的状态。显示哪些文件被修改、添加或删除了,哪些文件还未被 Git 追 > 踪。 |
git add <file> |
将指定文件的修改添加到暂存区。 |
git add -A |
-A 或 --all 表示将所有修改添加到暂存区。 |
git commit [-m "message"] |
将暂存区的所有内容提交到本地仓库,形成一个新的版本。"message" 是本次提交的说明,应清晰简洁地描述修改内 > 容。 |
git log |
显示从最近到最远的提交历史记录。包含提交 ID (SHA-1 hash)、作者、日期和提交信 > 息。 |
git rm <file> |
从工作区和暂存区中删除文件。这个操作也会被记录到版本历史 > 中。 |
git rm --cached <file> |
仅从暂存区移除文件,但保留工作区的文件。常用于将已跟踪的文件移出版本控制(例如添加到.gitignore > 后 |
git checkout <commit-id> |
(慎用)将工作区切换到指定的某次提交状态。这会使你处于 " 分离头指针 (detached HEAD)" 状态。通常用于查看旧版本,不建议在此状态下直接修 > 改提交。 |
git checkout <branch-name> |
切换到指定的分支。这是 checkout 最常用的功能。 |
git checkout -b <new-branch> |
创建一个名为 <new-branch> 的新分支,并立即切换到该分支。相当于git branch <new-branch> + git checkout <new-branch>。 |
git branch |
列出所有本地分支,当前所在分支会用 * 标记。 |
git branch <branch-name> |
创建一个新分支,但不切换过去。 |
git branch -d <branch-name> |
删除一个已经合并的分支。如果分支未合并,需要使用 -D 强制删除。 |
git checkout
$ tldr git checkout
...
 - Discard all unstaged changes in the current directory (see git reset for more undo-like commands):
   git checkout .

 - Discard unstaged changes to a given file:
   git checkout {{path/to/file}}

 - Replace a file in the current directory with the version of it committed in a given branch:
   git checkout {{branch_name}} -- {{path/to/file}}
子模块 
Question
一个 git 版本库中包含另一个版本库会发生什么?可以“正常” git init / git clone
git 会不允许正常 add/commit,警告这样 clone 时不会包含子版本库。
$ z demo-repo
$ cd sub-repo && mkdir submod
$ git init submod
Initialized empty Git repository in ~/demo/git_demo/demo-repo/sub-repo/submod/.git/
$ vim submod/1.txt # 写入一些东西
$ git add -A
warning: adding embedded git repository: sub-repo/submod
hint: You've added another git repository inside your current repository.
hint: Clones of the outer repository will not contain the contents of
hint: the embedded repository and will not know how to obtain it.
hint: If you meant to add a submodule, use:
hint:
hint:   git submodule add <url> sub-repo/submod
hint:
hint: If you added this path by mistake, you can remove it from the
hint: index with:
hint:
hint:   git rm --cached sub-repo/submod
hint:
hint: See "git help submodule" for more information.
我们通过 git submodule 来解决:
$ git submodule add ./sub-repo/submod sub-repo/submod
fatal: 'sub-repo/submod' already exists in the index
# 这需要我们把之前暂存区的内容先清空
$ git rm -rf --cached "sub-repo"
rm 'sub-repo/1.txt'
rm 'sub-repo/submod'
$ git submodule add ./sub-repo/submod sub-repo/submod
Adding existing repo at 'sub-repo/submod' to the index
看到多了一个 .gitmodules 文件,打开看看
$ batcat .gitmodules
───────┬───────────────────────────────────────────────────────────────────────────
       │ File: .gitmodules
───────┼───────────────────────────────────────────────────────────────────────────
   1   │ [submodule "sub-repo/submod"]
   2   │     path = sub-repo/submod
   3   │     url = ./sub-repo/submod
───────┴───────────────────────────────────────────────────────────────────────────
$ git submodule status
 f91d9559ac1f386ddb1876d63c0932e6584cad6b sub-repo/submod (heads/main)
再回头看 hint 第六行就明白了 path 和 url 的意思了;之后我们使用 git submodule 来管理子仓库:
$ tldr git submodule
git submodule
Inspects, updates and manages submodules.More information: https://git-scm.com/docs/git-submodule.

 - Install a repository's specified submodules:
   git submodule update --init --recursive

 - Add a Git repository as a submodule:
   git submodule add {{repository_url}}

 - Add a Git repository as a submodule at the specified directory:
   git submodule add {{repository_url}} {{path/to/directory}}

 - Update every submodule to its latest commit:
   git submodule foreach git pull
Tip
如果仓库托管在 GitHub 上,url 是对应链接,这样才能在克隆仓库时带上 submodule。
~/demo/git_demo/demo-repo master
$ git submodule add https://github.com/darstib/darstib.git github-resume
Cloning into '/home/qssg/demo/git_demo/demo-repo/github-resume'...
remote: Enumerating objects: 120, done.
remote: Counting objects: 100% (4/4), done.
remote: Compressing objects: 100% (3/3), done.
remote: Total 120 (delta 1), reused 4 (delta 1), pack-reused 116 (from 1)
Receiving objects: 100% (120/120), 7.87 MiB | 1024.00 KiB/s, done.
Resolving deltas: 100% (23/23), done.
$ ls
README.md  docs  github-resume  sub-repo
Question
我其实想要 github-resume 放进 demo-repo/sub-repo 中,我应该用 mv 吗?
- git 不仅仅是文件系统:Git 通过 .gitmodules 文件和父仓库中的特殊 "gitlink" 条目来跟踪子模块的位置和它应该指向的特定 commit;
- mv 只移动文件: 操作系统的 mv github-resume sub-repo/ 命令只会移动物理目录,但它不会更新 .gitmodules 文件中记录的 path,也不会更新父仓库索引中关于子模块位置的信息;如果只用 mv,Git 会认为子模块丢失了(因为它不在原来的 github-resume 路径了
) ,并且 sub-repo/github-resume 目录会被视为未跟踪的文件。
与 git Submodule 相关的文件
| 文件 / 目录 | 描述 |
|---|---|
| .gitmodules | 文本文件,存储了项目中所有子模块的映射关 |
| .git/config | 当运行 git submodule init 后,.gitmodules 中的子模块信息(主要是 URL)会被复制到这里 |
| .git/objects | ... |
移动子仓库时,应该使用 git mv:
添加提交后,我们查看 github 上,可以发现只有一个指向另一个 git 仓库特定版本的链接。
如果想要完全移除一个子模块,可以参考: How do I remove a submodule?,简单来说,即:
# Remove the submodule entry from .git/config
$ git submodule deinit -f path/to/submodule
# Remove the submodule directory from the superproject's .git/modules directory
$ rm -rf .git/modules/path/to/submodule
# Remove the entry in .gitmodules and remove the submodule directory located at path/to/submodule
$ git rm -f path/to/submodule
远程仓库管理与协作 
链接远程仓库 
与远程版本库的链接交互主要通过 git remote 来进行相关配置:
$ tldr git remote
git remote
Manage set of tracked repositories ("remotes").More information: https://git-scm.com/docs/git-remote.

 - List existing remotes with their names and URLs:
   git remote {{[-v|--verbose]}}

 - Add a remote:
   git remote add {{remote_name}} {{remote_url}}

 - Change the URL of a remote (use --add to keep the existing URL):
   git remote set-url {{remote_name}} {{new_url}}

 - Show the URL of a remote:
   git remote get-url {{remote_name}}

 - Remove a remote:
   git remote remove {{remote_name}}

 - Rename a remote:
   git remote rename {{old_name}} {{new_name}}
我们现在使用 git remote 查看信息,应当是空的(因为我们是 git init 初始化的 demo-repogit init 操作了
我们先复制下面的 http 链接,可以看见格式为 https://github.com/<username>/<reponame>.git ;运行以下命令,将你刚刚复制的 URL 添加为一个名为 origin 的远程仓库(origin 是远程仓库的默认习惯名称,即 remote_name
$ z demo-repo
$ git remote add origin https://github.com/darstib/demo-repo.git
$ git remote -v
origin  https://github.com/darstib/demo-repo.git (fetch)
origin  https://github.com/darstib/demo-repo.git (push)
remote_url / remote_name 的相关操作在上面也提及,这里不再展示。
更新远程仓库 
现在,将本地的提交推送到名为 origin 的远程仓库;第一次推送时,使用 -u 参数可以设置本地分支跟踪远程分支,这样以后推送拉取会更方便。提示我们输入用户名和密码:
$ git push -u origin master
Username for 'https://github.com': darstib
Password for 'https://darstib@github.com':
remote: Support for password authentication was removed on August 13, 2021.
remote: Please see https://docs.github.com/get-started/getting-started-with-git/about-remote-repositories#cloning-with-https-urls for information on currently recommended modes of authentication.
fatal: Authentication failed for 'https://github.com/darstib/demo-repo.git/'
按照错误信息的提示我们得知不再支持密码认证,使用 token 或者其他东西,下面简单介绍 token 。
personal access tokens
github 主页 > 头像 > setting 设置 > 左边最下边 Developer settings 开发者设置 > personal access tokens 个人访问令牌 (现在有 fine-grained tokens 和 Tokens(classic) 两种,前者是后者的改进,更加推荐,具体区别自行了解
点击右上角新建令牌,按照需要配置即可;注意 token 不要泄露,因为那代表可以在限制内以你的身份去访问你的账户。
配置完成后我们使用 token 推送即可,在后面我们会讲解配置 ssh 配对以简化这个过程;现在去对应仓库查看,内容已经更新。所以平时我们修改仓库常用的就是:
$ git add -A
$ git commit -m "type: summary"
$ git push [origin master] # 指定 remote_name 和 branch_name
点击仓库中的 Code 可以看到三个选项卡 "Local" "CodeSpace" "Copilot" ,后二者暂时不理睬,一般我们只关心 https url 和 ssh url ,使用 git clone 便可以拉取到本地以进行操作。
| 命令 | 描述 |
|---|---|
git clone <repo-url> |
从远程仓库地址 <repo-url> 复制整个项目及其版本历史到本地。这是获取远程项目的起始操作。 |
git remote -v |
显示当前配置的所有远程仓库及其 URL。默认的远程仓库名通常是 origin。 |
git remote add <name> <url> |
添加一个新的远程仓库,并为其指定一个简称<name> ( 例如origin ) 和地址 <url>。 |
git push <remote> <branch> |
将本地指定 <branch> 的提交推送到远程仓库<remote> ( 例如git push origin main )。这是将本地修改分享给其他人的主要方式。 |
git merge <branch-name> |
将指定 <branch-name> 的历史合并到当前所在的分支。如果 Git 能自动合并则完成;若有冲突,需要手动解决。 |
git pull <remote> <branch> |
从远程仓库 <remote> 的指定 <branch> 拉取最新更改,并尝试自动合并(merge)到当前本地分支。相当于git fetch + git merge。 |
git fetch <remote> |
从远程仓库 <remote> 下载最新的对象和引用(分支、标签等git log origin/main ) 再决定是否合并。 |
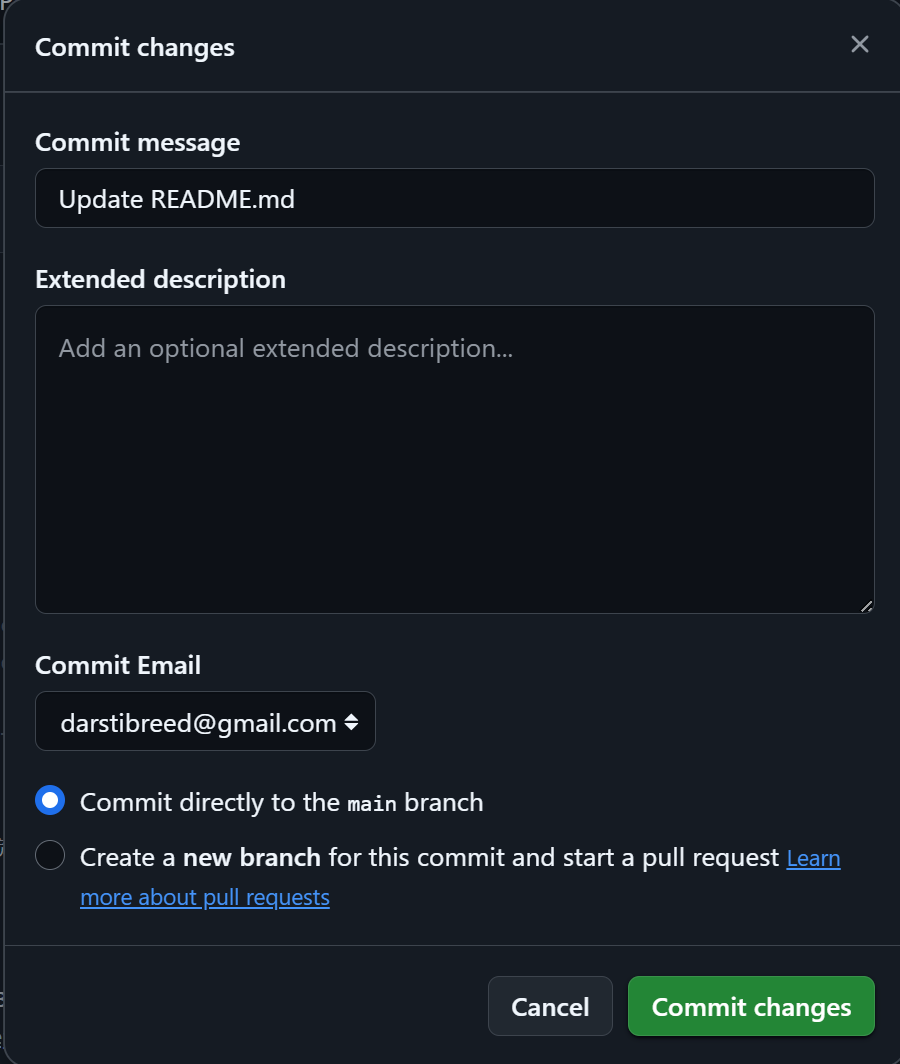
点击仓库上边选项卡中 Settings,可以对仓库进行设置管理;滑到最下面的 Danger Zone 以进行一些危险操作:修改这个仓库对其他人的可见性,转移这个仓库的所有权,仓库存档,删除仓库。
到此为止,你已经能够用 git 以及 github 等服务器实现一个类似于“个人网盘”的作用了。
Pull Request
about pull reqeust
A pull request is a proposal to merge a set of changes from one branch into another. In a pull request, collaborators can review and discuss the proposed set of changes before they integrate the changes into the main codebase. Pull requests display the differences, or diffs, between the content in the source branch and the content in the target branch.
pull request 提交贡献,来自 angular
-
在 GitHub 上搜索与您的提交相关的已打开或已关闭的 PR
, (您不应重复现有的工作) 。 -
确保有一个 issue 描述了您正在修复的问题,或记录了您想添加的功能的设计。预先讨论设计有助于确保我们准备好接受您的工作。
-
在发送 PR 之前,请签署我们的贡献者许可协议 (CLA)。我们不能接受没有签署 CLA 的代码。请确保您所有贡献的 Git 提交都使用与您的 CLA 签名相关联的电子邮件地址来创建。
-
Fork angular/angular 仓库。
-
在您 Fork 的仓库中,在一个新的 git 分支中进行更改:
-
创建您的补丁,包括适当的测试用例。
-
遵循我们的编码规范。
-
按照开发者文档中的说明,运行完整的 Angular 测试套件,并确保所有测试都通过。
-
使用遵循我们提交消息约定的描述性提交消息来提交您的更改。遵守这些约定是必要的,因为发布说明是根据这些消息自动生成的。
注意:可选的
commit --all命令行选项会自动 “add” 和 “rm” 编辑过的文件。 -
将您的分支推送到 GitHub:
-
在 GitHub 中,向
angular:main发送一个拉取请求。