MCP
基于 OpenMCP 的天气查询 MCP 开发 
环境配置 
- 创建并进入项目文件夹
mkdir weather-mcp && cd weather-mcp - 安装 python3 和 pip (如果没有安装)
sudo apt install python3-venv python3-pip - uv 安装及初始化
插件安装 
OpenMCP 一款用于 MCP 服务端调试的一体化 vscode/trae/cursor 插件集成 Inspector + MCP 客户端基础功能,开发测试一体化。
如果使用的是主流 VLE (Visual-like Editor) ,那么直接搜索插件 “openmcp"。插件的具体使用参考教程继续阅读即可,详细且不长。
MCP 开发 
在 uv init 后,项目架构就出现了;我们主要修改“main.py” (或者新建一个 py 文件亦可
在此我们以基于查询 OpenWeatherMap 的请求为原理,构建一个可查询当前天气和预测天气的 MCP 服务,具体代码如下,API_KEY 应该自己申请:
weather-mcp.py
import requests
import json
from typing import Dict, Any
from mcp.server.fastmcp import FastMCP

mcp = FastMCP("darstib's weather getter")
KEY_ALERT = "YOUR_API_KEY_HERE"
# OpenWeatherMap API 配置
# 请访问 https://openweathermap.org/api 获取免费的API密钥
API_KEY = KEY_ALERT  # 替换为API密钥
BASE_URL = "https://api.openweathermap.org/data/2.5"

def get_weather_data(city: str) -> Dict[str, Any]:
    """从OpenWeatherMap API获取天气数据"""
    try:
        # 当前天气API端点
        url = f"{BASE_URL}/weather"
        params = {
            "q": city,
            "appid": API_KEY,
            "units": "metric",  # 使用摄氏度
            "lang": "zh_cn"     # 中文
        }

        response = requests.get(url, params=params)
        response.raise_for_status()

        return response.json()
    except requests.RequestException as e:
        raise Exception(f"获取天气数据失败: {str(e)}")
    except json.JSONDecodeError as e:
        raise Exception(f"解析天气数据失败: {str(e)}")

def get_forecast_data(city: str, days: int = 3) -> Dict[str, Any]:
    """从OpenWeatherMap API获取天气预报数据"""
    try:
        # 5天预报API端点
        url = f"{BASE_URL}/forecast"
        params = {
            "q": city,
            "appid": API_KEY,
            "units": "metric",
            "lang": "zh_cn",
            "cnt": days * 8  # 每天8个时间点(每3小时一个)
        }

        response = requests.get(url, params=params)
        response.raise_for_status()

        return response.json()
    except requests.RequestException as e:
        raise Exception(f"获取预报数据失败: {str(e)}")
    except json.JSONDecodeError as e:
        raise Exception(f"解析预报数据失败: {str(e)}")

@mcp.tool(
    name="current_weather",
    description="获取指定城市的当前天气信息,city 参数应该使用城市的英文名称"
)
def get_current_weather(city: str) -> str:
    """获取指定城市的当前天气信息"""
    try:
        if API_KEY == KEY_ALERT:
            return "⚠️ 请先设置OpenWeatherMap API密钥。访问 https://openweathermap.org/api 获取免费密钥。"

        data = get_weather_data(city)

        # 提取关键信息
        temp = data["main"]["temp"]
        feels_like = data["main"]["feels_like"]
        humidity = data["main"]["humidity"]
        pressure = data["main"]["pressure"]
        description = data["weather"][0]["description"]
        wind_speed = data["wind"]["speed"]

        # 格式化输出
        weather_info = f"""
🌍 {city} 当前天气
━━━━━━━━━━━━━━━━━━━━━━━━━━━━━━
🌡️  温度: {temp}°C (体感温度: {feels_like}°C)
☁️  天气: {description}
💧  湿度: {humidity}%
🌬️  风速: {wind_speed} m/s
🔽  气压: {pressure} hPa
━━━━━━━━━━━━━━━━━━━━━━━━━━━━━━
"""
        return weather_info.strip()

    except Exception as e:
        return f"❌ 获取天气信息失败: {str(e)}"

@mcp.tool(
    name="forecast_weather",
    description="获取指定城市的天气预报,city 参数应该使用城市的英文名称"
)
def get_forecast_weather(city: str, days: int = 3) -> str:
    """获取指定城市的天气预报"""
    try:
        if API_KEY == KEY_ALERT:
            return "⚠️ 请先设置OpenWeatherMap API密钥。访问 https://openweathermap.org/api 获取免费密钥。"

        if days > 7:
            days = 7

        data = get_forecast_data(city, days)

        forecast_info = f"🌍 {city} 未来{days}天天气预报\n"
        forecast_info += "━━━━━━━━━━━━━━━━━━━━━━━━━━━━━━\n"

        # 按天分组预报数据
        daily_forecasts = {}
        for item in data["list"]:
            date = item["dt_txt"][:10]  # 取日期部分
            if date not in daily_forecasts:
                daily_forecasts[date] = []
            daily_forecasts[date].append(item)

        # 格式化每天的预报
        for date, forecasts in list(daily_forecasts.items())[:days]:
            # 取当天中午的预报作为代表
            midday_forecast = forecasts[len(forecasts)//2] if forecasts else forecasts[0]

            temp = midday_forecast["main"]["temp"]
            description = midday_forecast["weather"][0]["description"]
            humidity = midday_forecast["main"]["humidity"]
            wind_speed = midday_forecast["wind"]["speed"]

            forecast_info += f"📅 {date}\n"
            forecast_info += f"   🌡️ {temp}°C | ☁️ {description}\n"
            forecast_info += f"   💧 {humidity}% | 🌬️ {wind_speed} m/s\n\n"

        forecast_info += "━━━━━━━━━━━━━━━━━━━━━━━━━━━━━━"
        return forecast_info.strip()

    except Exception as e:
        return f"❌ 获取天气预报失败: {str(e)}"
调试过程省略;需要注意的是,在系统提示词中应该说明需要以英文进行查询(基于 OpenWeather 的限制
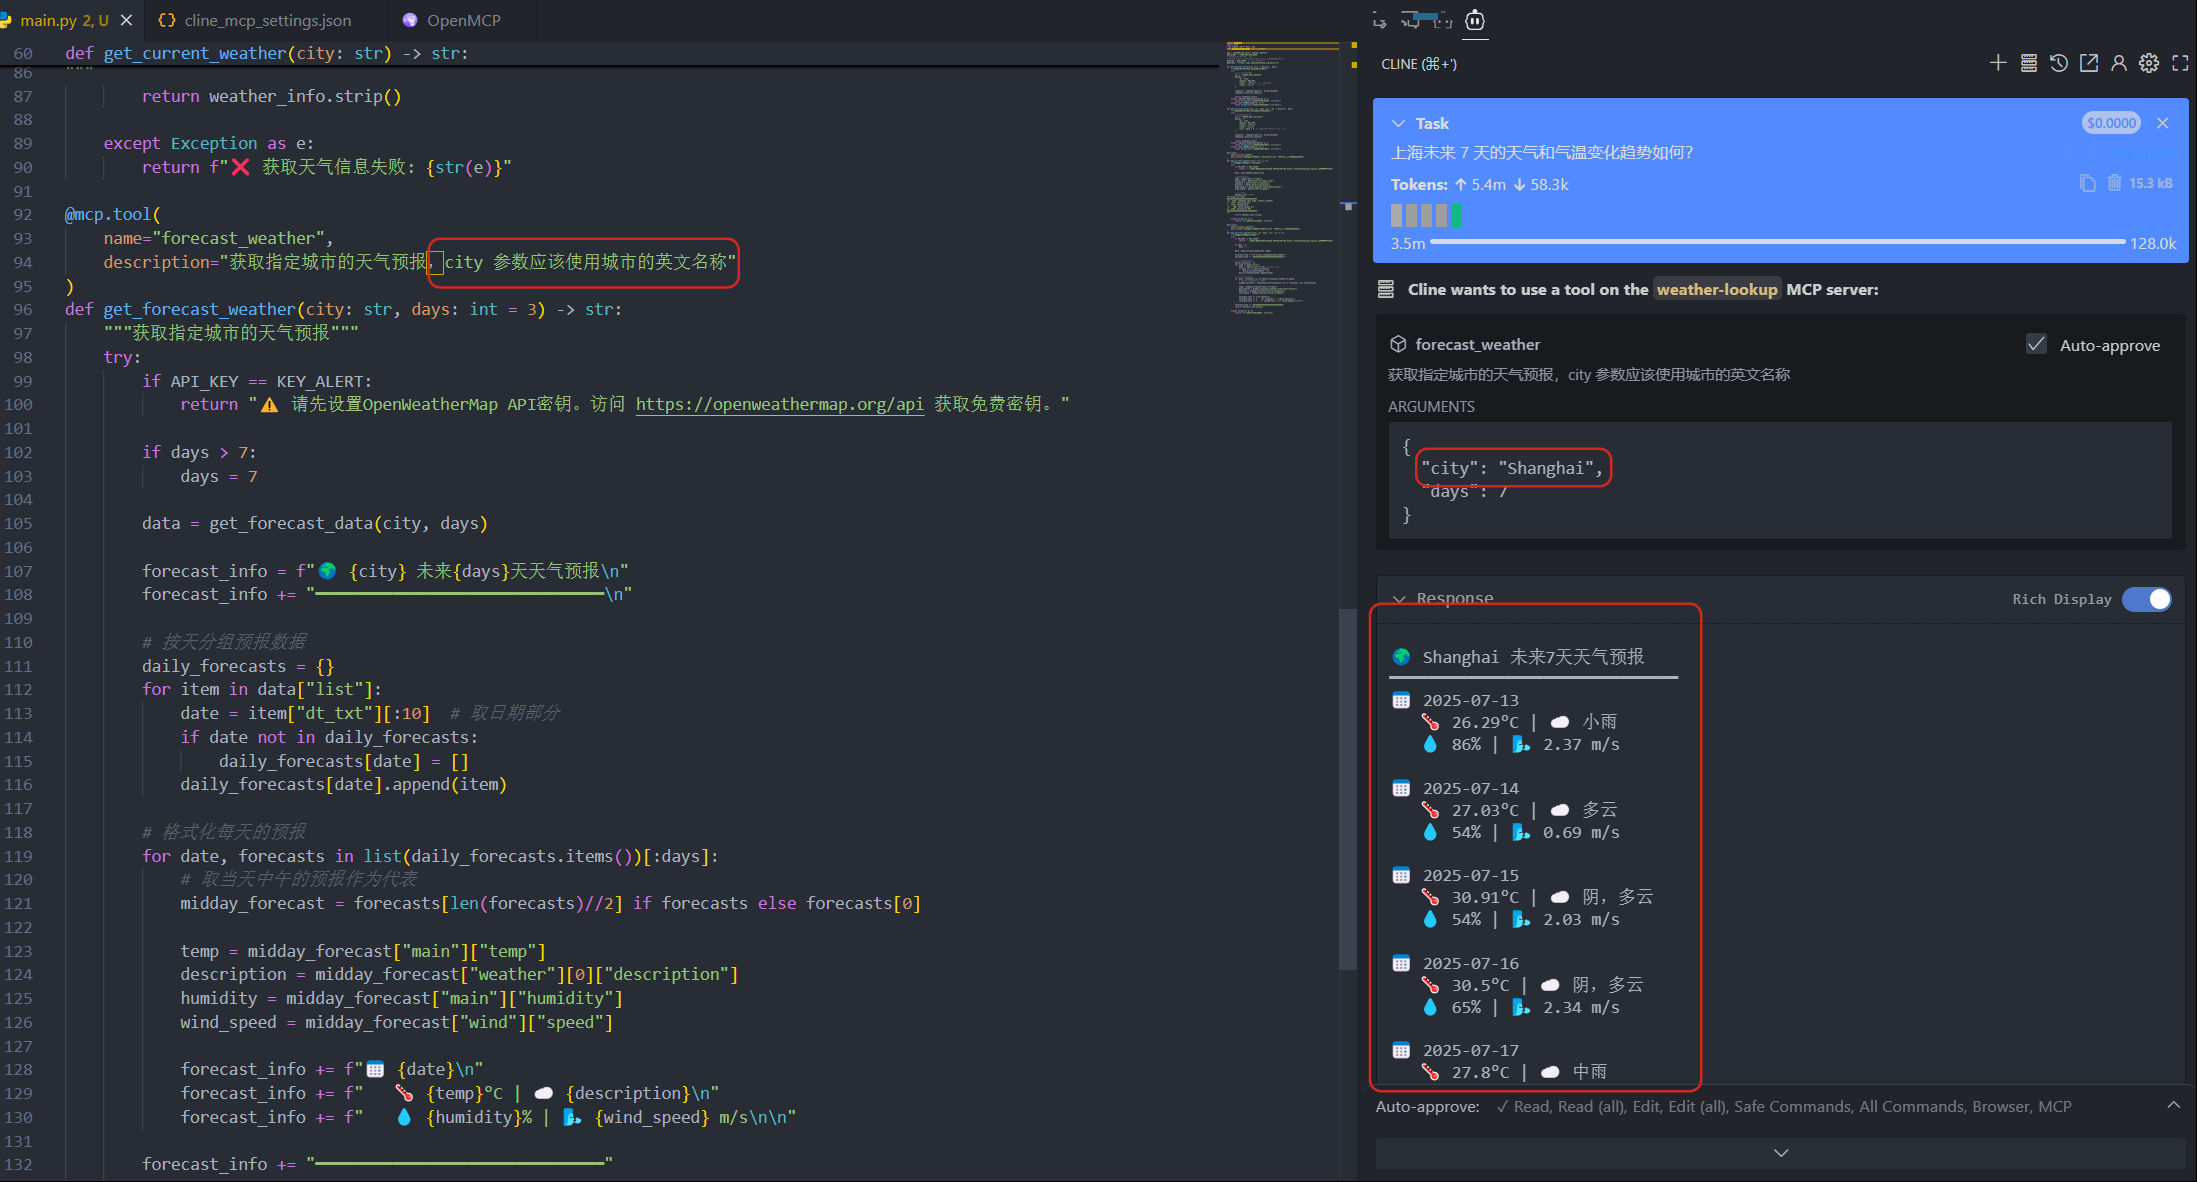
看看效果:
可以看到响应效果挺不错的,花里胡哨的图标仅供一乐,实际返回信息整合成表格等即可。
接入 Cline 
- 搜索 cline 安装,配置好 LLM 的 api 后
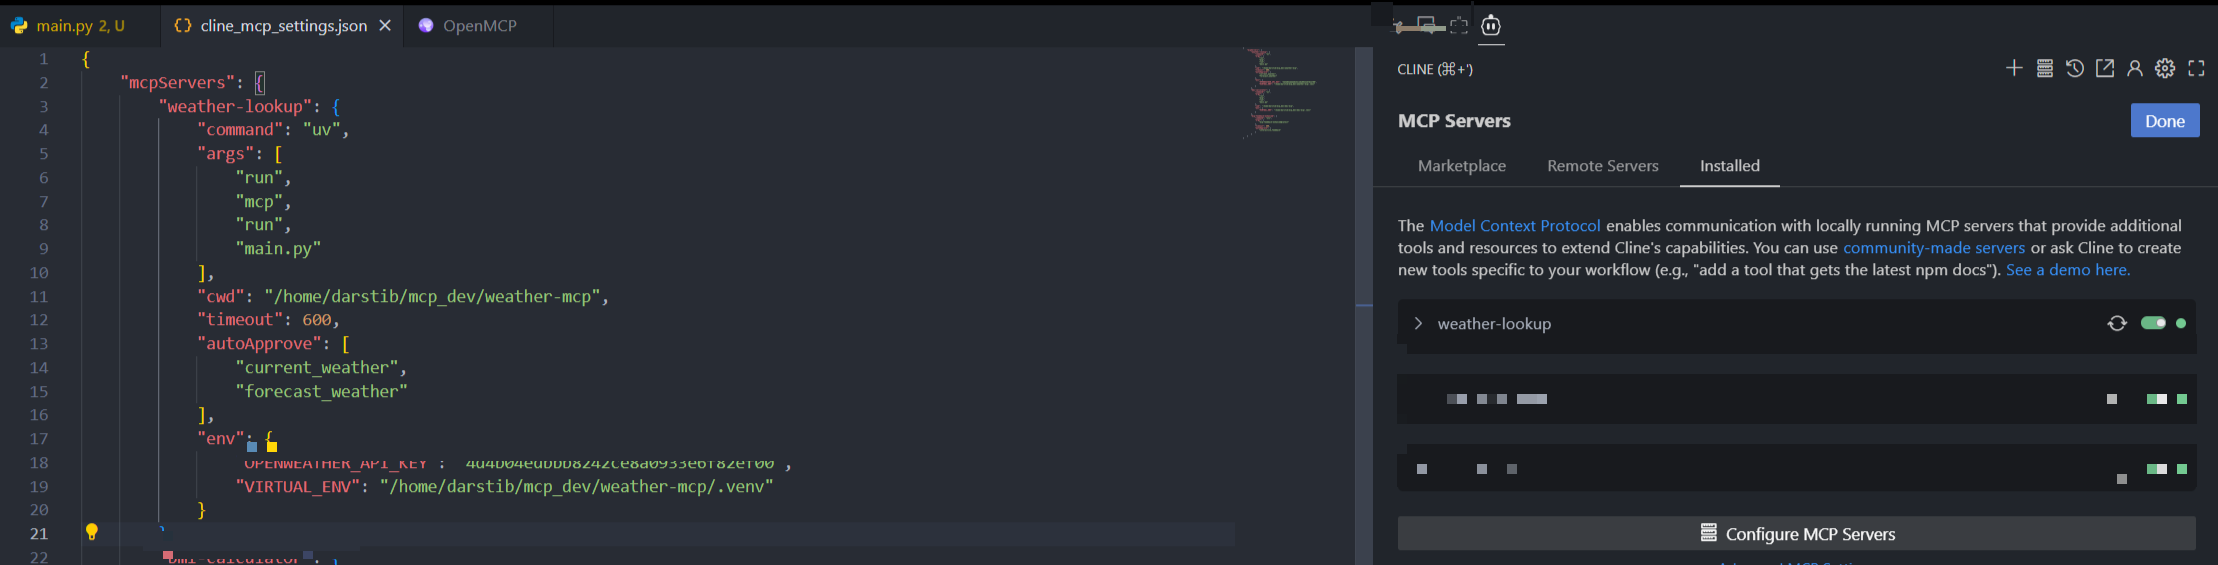
- 找到 MCP 的入口(三本书叠加的图标
) ,在 Installed 中点击 "Configure MCP Servers" -
在
cline_mcp_settings.json中填入下面的内容(注意路径需要修改) :cline_mcp_settings.json{ "mcpServers": { "weather-lookup": { "command": "uv", "args": [ "run", "mcp", "run", "main.py" ], "cwd": "/home/darstib/mcp_dev/weather-mcp", "timeout": 600, "autoApprove": [ "current_weather", "forecast_weather" ], "env": { "VIRTUAL_ENV": "/home/darstib/mcp_dev/weather-mcp/.venv" } } } }
保存后应该可以看见右边对应出现了服务:
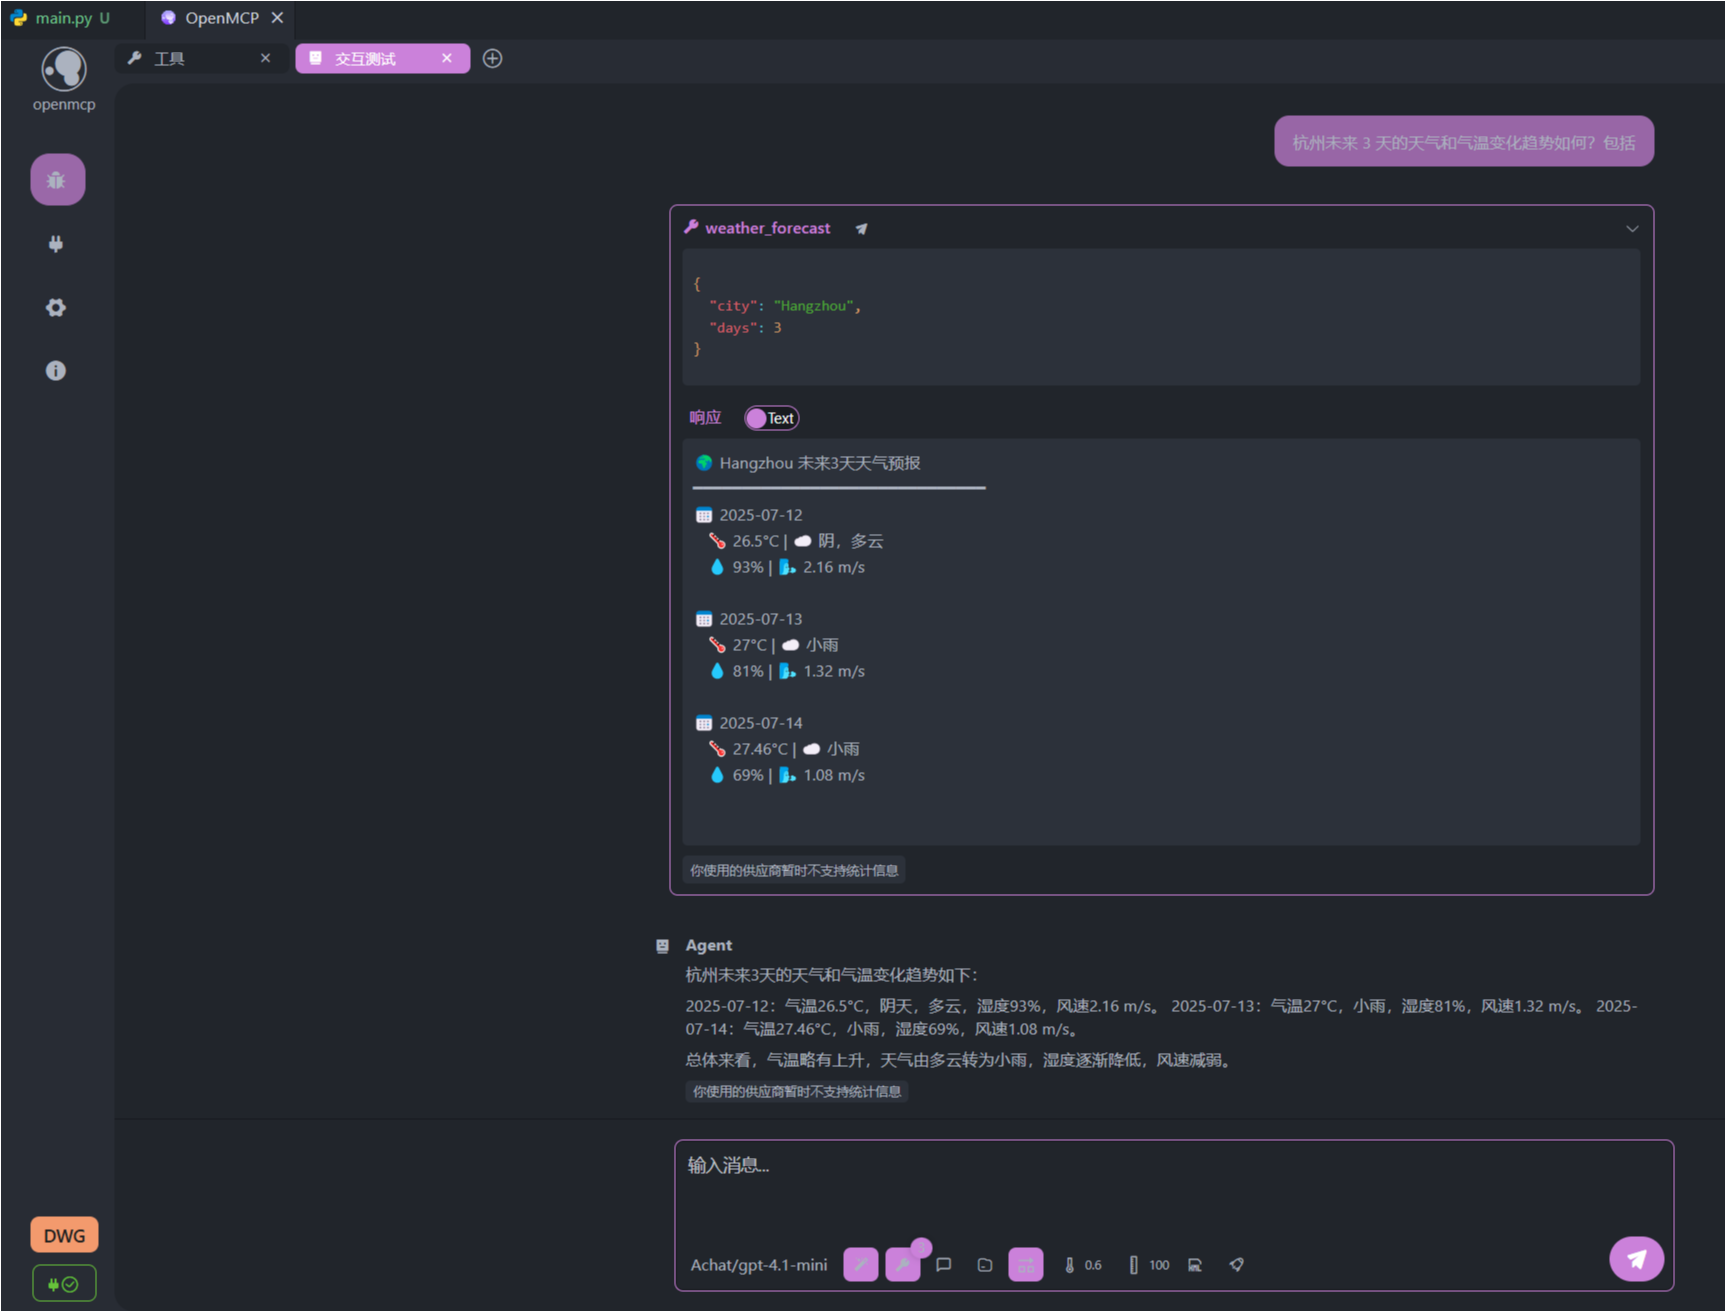
测试如下: